JavaWeb
一、JavaWeb
DAO层的设计理念:单精度设计,只考虑细粒度。比如添加只考虑添加,不考虑重复数据的情况。
1.1 Servlet
1.2 Filter
过滤器,可以管理JavaWeb资源,例如进行访问控制。
1
2
3
4
5
6
7
8
9
10
11
12
13
14
15
16
17
18
| public class Target01Filter implements Filter {
@Override
public void init(FilterConfig filterConfig) throws ServletException {}
@Override
public void doFilter(ServletRequest request, ServletResponse response, FilterChain chain) throws IOException, ServletException {
String message = request.getParameter("message");
if ("monster".equals(message)) {
chain.doFilter(request, response);
}else{
request.getRequestDispatcher("/SpecialServlet?method=toSpecialPage").forward(request, response);
}
}
@Override
public void destroy() {}
}
|
在写完代码过后,要在xml中进行配置,或者使用注解:@WebFilter("/lxxx")。
若采用注解的方式,则过滤器的执行顺序是全类名的顺序。
1.3 事务
事务管理不能以DAO的单精度方法为单位,而应该以业务层的方法为单位。
1.4 Listener
MVC
三层架构(衍生ssm框架):
Maven
1.说明
Maven是专门用来构建和管理Java项目的工具
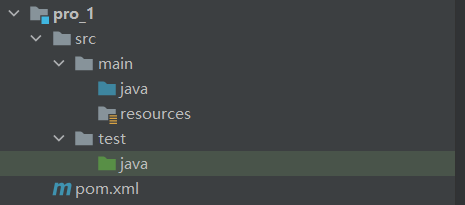 image-20220430220515322
如图是Maven默认目录结构,其中pom.xml是Maven核心配置文件(Pom:项目对象模型)
2.Maven作用:
1.可以更方便的管理依赖
2.标准化项目构建流程
3.标准化项目结构
3.仓库分类
- 本地仓库
- 中央仓库:又官方搭建
- 远程仓库:一般为公司自己搭建的私有仓库
ps:若未在本地找到仓库,则自动去中央仓库进行下载
若搭建了远程仓库,寻找jar包时,现在远程仓库查找,若没有则去中央仓库进行查找
4.安装
解压>>配置环境变量MAVEN_HOME>>修改conf.xml文件配置本地仓库,修改mirrors
5.常见命令
1
2
3
4
5
| mvn compile 编译;
mvn clean 清理;
mvn test 测试;
mvn package 打包;
mvn install 安装;
|
6.坐标
groupid:通常是域名反写
artifactid:通常是模块名称
version:版本号
7.依赖管理
1
2
3
4
5
6
7
8
9
| <dependencies>
<dependency>
<groupId>mysql</groupId>
<artifactId>mysql-connector-java</artifactId>
<version>5.1.45</version>
</dependency>
</dependencies>
|
- IDEA中快捷键alt+enter可快速添加依赖
- scope标签:表明当前依赖作用范围
JDBC
java.sql.Driver 接口是所有 JDBC
驱动程序需要实现的接口。这个接口是提供给数据库厂商使用的,不同数据库厂商提供不同的实现。
如何连接数据库?(最常用的方法)
1
2
3
4
5
6
7
8
9
10
11
12
13
14
15
16
17
18
19
20
21
22
23
| import java.io.InputStream;
import java.sql.Connection;
import java.sql.DriverManager;
import java.util.Properties;
public class Main {
public static void main(String[] args) throws Exception {
ClassLoader loader = Main.class.getClassLoader();
InputStream is = loader.getResourceAsStream("JDBC.properties");
Properties info = new Properties();
info.load(is);
String user = info.getProperty("user");
String password = info.getProperty("password");
String url = info.getProperty("url");
String driver = info.getProperty("driver");
Class.forName(driver);
Connection connection = DriverManager.getConnection(url, user, password);
System.out.println(connection);
}
}
|
一个数据库连接就是一个Socket连接
Statement:执行静态sql语句
PreparedStatement:预编译SQL语句
ORM(对象关系映射)编程思想:
- 一个数据表对应一个java类
- 一条记录对应一个java对象
- 一个字段对应一个属性
封装JDBCUtils
1
2
3
4
5
6
7
8
9
10
11
12
13
14
15
16
17
18
19
20
21
22
23
24
25
26
27
28
29
30
31
32
33
34
35
36
37
| import java.io.InputStream;
import java.sql.Connection;
import java.sql.DriverManager;
import java.sql.SQLException;
import java.sql.Statement;
import java.util.Properties;
public class JDBCUtils {
public static Connection getConnection() throws Exception {
ClassLoader loader = Main.class.getClassLoader();
InputStream is = loader.getResourceAsStream("JDBC.properties");
Properties info = new Properties();
info.load(is);
String user = info.getProperty("user");
String password = info.getProperty("password");
String url = info.getProperty("url");
String driver = info.getProperty("driver");
Class.forName(driver);
return DriverManager.getConnection(url, user, password);
}
public static void closeResource(Connection conn, Statement s) {
try {
if (conn != null) conn.close();
} catch (SQLException e) {
e.printStackTrace();
}
try {
if (s != null) s.close();
} catch (SQLException e) {
e.printStackTrace();
}
}
}
|
如何执行SQL语句?(PreparedStatement)
PreparedStatement是Statement的子接口,表示一条预编译过的SQL语句
execute与executeUpdate的有什么区别呢?
返回值方面,execute返货布尔值,executeUpdate返回有多少条数据受到了影响
功能方面,execute可以执行查询语句,然后通过getResultSet把结果提取出来,executeUpdate不行;
Java与SQL数据类型对应表
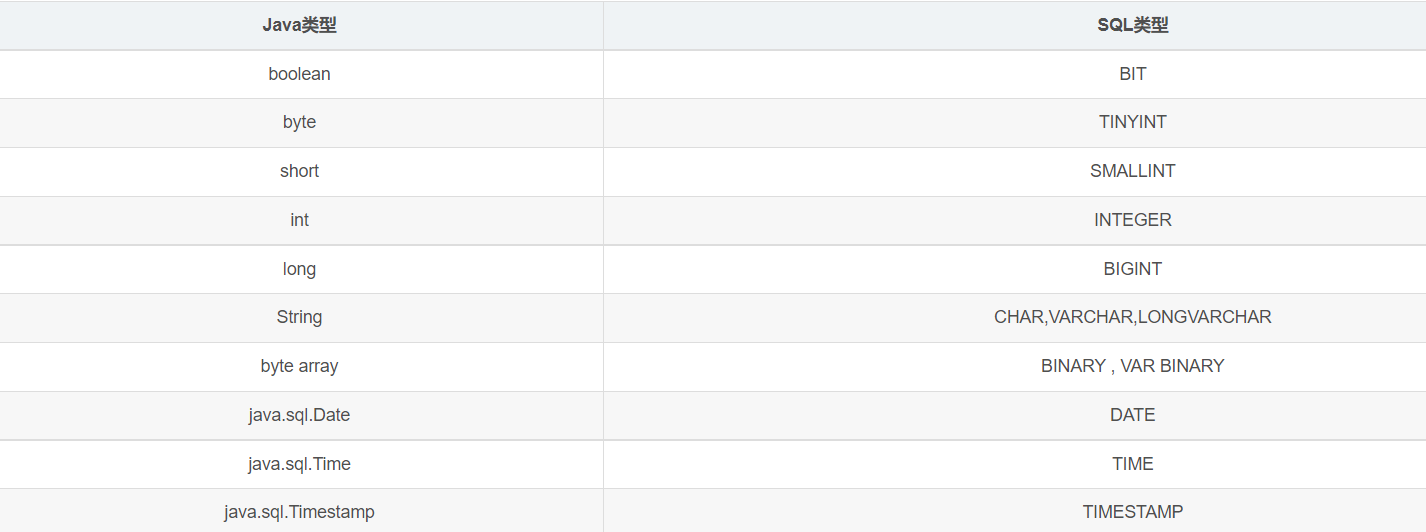 image-20221020181957239
通用的查询操作:
1
2
3
4
5
6
7
8
9
10
11
12
13
14
15
16
17
18
19
20
21
22
23
24
25
26
27
28
29
30
31
32
33
|
public static <T> T getInstance(Class<T> clazz, String sql, Object... args) {
Connection conn = null;
PreparedStatement ps = null;
ResultSet rs = null;
try {
conn = JDBCUtils.getConnection();
ps = conn.prepareStatement(sql);
for (int i = 0; i < args.length; i++) {
ps.setObject(i + 1, args[i]);
}
rs = ps.executeQuery();
ResultSetMetaData rsmd = rs.getMetaData();
int columnCount = rsmd.getColumnCount();
if (rs.next()) {
T t = clazz.newInstance();
for (int i = 0; i < columnCount; i++) {
Object columnVal = rs.getObject(i + 1);
String columnName = rsmd.getColumnName(i + 1);
Field declaredField = clazz.getDeclaredField(columnName);
declaredField.setAccessible(true);
declaredField.set(t, columnVal);
}
return t;
}
} catch (Exception e) {
e.printStackTrace();
} finally {
JDBCUtils.closeResource(conn, ps);
}
return null;
}
|
通用的增删改操作:
1
2
3
4
5
6
7
8
9
10
11
12
13
14
15
16
17
18
|
public static void update(String sql, Object... args) {
Connection conn = null;
PreparedStatement ps = null;
try {
conn = JDBCUtils.getConnection();
ps = conn.prepareStatement(sql);
for (int i = 0; i < args.length; i++) {
ps.setObject(i + 1, args[i]);
}
ps.execute();
} catch (Exception e) {
e.printStackTrace();
} finally {
JDBCUtils.closeResource(conn, ps);
}
}
|
ResultSetMetaData可用于获取关于 ResultSet
对象中列的类型和属性信息的对象
- getColumnName(int column):获取指定列的名称
- getColumnLabel(int column):获取指定列的别名
- getColumnCount():返回当前 ResultSet
对象中的列数。
操作Blob类型字段
- MySQL中,BLOB是一个二进制大型对象,是一个可以存储大量数据的容器,它能容纳不同大小的数据。
- 插入BLOB类型的数据必须使用PreparedStatement,因为BLOB类型的数据无法使用字符串拼接写的。
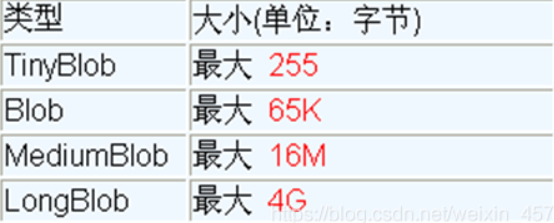
数据表中插入大数据类型
1
2
3
4
5
6
7
8
9
10
11
12
13
14
15
16
17
18
|
Connection conn = JDBCUtils.getConnection();
String sql = "insert into customers(name,email,birth,photo)values(?,?,?,?)";
PreparedStatement ps = conn.prepareStatement(sql);
ps.setString(1, "徐海强");
ps.setString(2, "xhq@126.com");
ps.setDate(3, new Date(new java.util.Date().getTime()));
FileInputStream fis = new FileInputStream("xhq.png");
ps.setBlob(4, fis);
ps.execute();
fis.close();
JDBCUtils.closeResource(conn, ps);
|
读取大数据
1
2
3
4
5
6
7
8
9
10
11
12
13
14
15
16
17
18
19
20
21
22
23
24
25
26
27
28
29
30
31
32
| String sql = "SELECT id, name, email, birth, photo FROM customer WHERE id = ?";
conn = getConnection();
ps = conn.prepareStatement(sql);
ps.setInt(1, 8);
rs = ps.executeQuery();
if(rs.next()){
Integer id = rs.getInt(1);
String name = rs.getString(2);
String email = rs.getString(3);
Date birth = rs.getDate(4);
Customer cust = new Customer(id, name, email, birth);
System.out.println(cust);
Blob photo = rs.getBlob(5);
InputStream is = photo.getBinaryStream();
OutputStream os = new FileOutputStream("c.jpg");
byte [] buffer = new byte[1024];
int len = 0;
while((len = is.read(buffer)) != -1){
os.write(buffer, 0, len);
}
JDBCUtils.closeResource(conn, ps, rs);
if(is != null){
is.close();
}
if(os != null){
os.close();
}
}
|
数据库事务
默认情况下为自动提交,不能回滚。
关闭数据库连接,数据就会自动提交。
那么在Java中如何处理SQL的事务呢?
1
2
3
4
5
6
7
8
9
10
11
12
13
14
15
16
17
18
19
20
21
22
23
24
25
26
27
| import java.sql.Connection;
public class Main {
public static void main(String[] args) throws Exception {
Connection conn = null;
try {
conn = JDBCUtils.getConnection();
conn.setAutoCommit(false);
String sql = "insert into users values(?,?,?)";
int update = JDBCUtils.update(sql, null, "d4wn", "d4wn");
System.out.println(update);
conn.commit();
} catch (Exception e) {
e.printStackTrace();
if (conn != null) {
conn.rollback();
}
} finally {
if (conn != null) {
conn.setAutoCommit(true);
}
JDBCUtils.closeResource(conn, null);
}
}
}
|
事务的ACID属性
- 原子性
原子性是指事务是一个不可分割的工作单位,事务中的操作要么都发生,要么都不发生。
- 一致性
事务必须使数据库从一个一致性状态变换到另外一个一致性状态。
- 隔离性 各个事务互不干扰。
- 持久性 事务一旦提交,对数据库中的改变就是永久的。
数据库的并发问题有哪些呢?
那么常见的隔离级别有几个呢?
有四种,但是常见的是只有两个
- 读已提交数据 可以避免脏读
- 可重复读 可以避免脏读和不可重复读
MyBatis
1.简介
官网:https://mybatis.org/mybatis-3/zh/index.html
MyBatis是一款简化JDBC开发的持久层框架
JavaEE三层架构:表现层,业务层,持久层
2.实战
- 添加驱动依赖和mybatis依赖
- 添加用户类
- 编写mybatis核心配置文件(从官网copy)放到resources文件夹下更改url,user,passwd,driverpath,还有映射文件路径
- 编写映射文件(copy官网)
- 进入测试类
- 加载mybatis配置文件,获取SqlSessionFactory配置文件
- 获取SqlSession对象,执行Sql
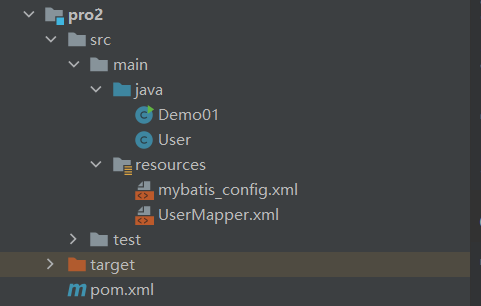 image-20220430235643121
1
2
3
4
5
6
7
8
9
10
11
12
13
14
15
16
17
18
19
20
21
| <?xml version="1.0" encoding="UTF-8" ?>
<!DOCTYPE configuration
PUBLIC "-//mybatis.org//DTD Config 3.0//EN"
"http://mybatis.org/dtd/mybatis-3-config.dtd">
<configuration>
<environments default="development">
<environment id="development">
<transactionManager type="JDBC"/>
<dataSource type="POOLED">
<property name="driver" value="com.mysql.cj.jdbc.Driver"/>
<property name="url" value="jdbc:mysql://localhost:3306/test?serverTimezone=UTC&useSSL=true"/>
<property name="username" value="root"/>
<property name="password" value="root"/>
</dataSource>
</environment>
</environments>
<mappers>
<mapper resource="UserMapper.xml"/>
</mappers>
</configuration>
|
1
2
3
4
5
6
7
8
9
10
| <?xml version="1.0" encoding="UTF-8" ?>
<!DOCTYPE mapper
PUBLIC "-//mybatis.org//DTD Mapper 3.0//EN"
"http://mybatis.org/dtd/mybatis-3-mapper.dtd">
<mapper namespace="test">
<select id="selectAll" resultType="User">
select * from t;
</select>
</mapper>
|
1
2
3
4
5
6
7
8
9
10
11
12
13
14
15
16
17
18
19
20
21
22
23
| import org.apache.ibatis.io.Resources;
import org.apache.ibatis.session.SqlSession;
import org.apache.ibatis.session.SqlSessionFactory;
import org.apache.ibatis.session.SqlSessionFactoryBuilder;
import java.io.IOException;
import java.io.InputStream;
import java.util.List;
public class Demo01 {
public static void main(String[] args) throws IOException {
String resource = "mybatis_config.xml";
InputStream inputStream = Resources.getResourceAsStream(resource);
SqlSessionFactory sqlSessionFactory = new SqlSessionFactoryBuilder().build(inputStream);
SqlSession sqlSession = sqlSessionFactory.openSession();
List<User> user = sqlSession.selectList("test.selectAll");
System.out.println(user);
}
}
|
3.Mapper代理开发
步骤
- 定义与SQL映射文件同名的Mapper接口,并且将二者放在同一目录下(或者在resource下新建目录“com/acdawn/mapper”)。
- 设置SQL映射文件的namespace为Mapper接口全限定名
- 在Mapper接口中定义方法,方法名为SQL映射文件的id。
ps:
1
2
3
4
5
| <mappers>
<package name="com/acdawn/mapper"/>
</mappers>
|
1
2
3
4
5
6
7
8
9
10
11
12
13
14
15
16
17
18
| public class Demo01 {
public static void main(String[] args) throws IOException {
String resource = "mybatis_config.xml";
InputStream inputStream = Resources.getResourceAsStream(resource);
SqlSessionFactory sqlSessionFactory = new SqlSessionFactoryBuilder().build(inputStream);
SqlSession sqlSession = sqlSessionFactory.openSession();
UserMapper mapper = sqlSession.getMapper(UserMapper.class);
List<User> user = mapper.selectAll();
System.out.println(user);
}
}
|
1
2
3
4
5
6
7
8
9
10
11
| <?xml version="1.0" encoding="UTF-8" ?>
<!DOCTYPE mapper
PUBLIC "-//mybatis.org//DTD Mapper 3.0//EN"
"http://mybatis.org/dtd/mybatis-3-mapper.dtd">
<mapper namespace="com.acdawn.mapper.UserMapper">
<select id="selectAll" resultType="User">
select * from t;
</select>
</mapper>
|
4.MyBatis核心配置文件
1
2
3
4
5
6
7
8
9
10
11
12
13
14
15
16
17
|
<environments default="development">
<environment id="development">
<transactionManager type="JDBC">
<property name="..." value="..."/>
</transactionManager>
<dataSource type="POOLED">
<property name="driver" value="${driver}"/>
<property name="url" value="${url}"/>
<property name="username" value="${username}"/>
<property name="password" value="${password}"/>
</dataSource>
</environment>
</environments>
<mappers>
<package name="org.mybatis.builder"/>
</mappers>
|
Spring
导入Spring依赖
1
2
3
4
5
6
7
8
| <dependencies>
<!-- 导入spring坐标-->
<dependency>
<groupId>org.springframework</groupId>
<artifactId>spring-context</artifactId>
<version>5.2.10.RELEASE</version>
</dependency>
</dependencies>
|
IOC(Inversion of Control)
什么是IOC:
2.IOC过程(进一步降低耦合性)
xml配置文件,配置创建的对象
通过反射创建对象
1
2
3
| 获取IOC容器
ApplicationContext app = ClassPathXmlApplicationContext("applicationContext.xml");
app.getBean("")
|
3.Spring容器实现的两种方式
BeanFactory
Spring内部使用接口,不提供开发人员进行使用
加载配置文件的时候不会创建对象,在获取对象的时候才会去创建对象
ApplicationContext
是BeanFactory的子接口,功能更为强大,面向开发人员
加载配置文件的时候就完成对象的创建
 image-20220508102635271
按下ctrl+h查看结构,其中ClassPathXmlApplicationContext解析src目录下的xml,FileSystemXmlApplicationContext需要选路径
4.IOC操作-Bean管理
4.1基于xml注入属性
DI:依赖注入(在容器中建立bean与bean的联系)
什么是依赖注入?
比如在service中用到了dao方法,那么就在service类中定义set方法,然后在配置中将dao类注入进去.
注入的东西可分为应用类型和简单类型
注入方式大致分为两类:setter注入和构造器注入
使用set方法注入基本类型
自己开发的模块推荐使用setter注入
1
2
3
| <bean id="" class="">
<property name="属性名称" value="注入值"></property>
</bean>
|
使用有参数的构造注入
1
2
3
4
| <bean id="" class="">
<constructor-arg name="属性名称(形参名)" value="注入值 "></constructor-arg>
</bean>
|
xml注入其他类型属性
1
2
3
4
5
6
|
<bean id="" class="">
<property name="属性名称">
<null/>
</property>
</bean>
|
1
2
3
4
5
6
7
8
9
|
<bean id="" class="">
<property name="属性名称">
<value>
<![CDATA[注入值]]>
</value>
</property>
</bean>
|
1
2
3
4
5
|
<bean id="userService" class="">
<property name="属性名称" ref="userDao"></property>
</bean>
<bean id="userDao" class=""/ >
|
1
2
3
4
5
6
7
8
|
<bean id="userService" class="">
<property name="属性名称">
<bean id="userDao" class="">
<property name="" value=""></property>
</bean>
</property>
</bean>
|
1
2
3
4
5
6
7
8
9
10
|
<bean id="userService" class="">
<property name="属性名称">
<array>
<value></value>
<value></value>
<value></value>
</array>
</property>
</bean>
|
1
2
3
4
5
6
7
8
9
10
|
<bean id="userService" class="">
<property name="属性名称">
<list>
<value></value>
<value></value>
<value></value>
</list>
</property>
</bean>
|
1
2
3
4
5
6
7
8
9
10
|
<bean id="userService" class="">
<property name="属性名称">
<map>
<value></value>
<value></value>
<value></value>
</map>
</property>
</bean>
|
1
2
3
4
5
6
7
8
9
10
|
<bean id="userService" class="">
<property name="属性名称">
<map>
<entry key="" value=""></entry>
<entry key="" value=""></entry>
<entry key="" value=""></entry>
</map>
</property>
</bean>
|
1
2
3
4
5
6
7
8
9
10
|
<bean id="userService" class="">
<property name="属性名称">
<set>
<value></value>
<value></value>
<value></value>
</set>
</property>
</bean>
|
1
2
3
4
5
6
7
8
9
10
11
12
13
14
15
|
<bean id="userService" class="">
<property name="属性名称">
<list>
<value>
<ref bean=""></ref>
</value>
<value>
<ref bean=""></ref>
</value>
</list>
</property>
</bean>
<bean id="emp" class=""></bean>
|
把集合注入部分提取出来
作用:模块化处理,可以复用
在spring配置文件中引入名称空间util
1
2
3
4
5
6
7
| <?xml version="1.0" encoding="UTF-8"?>
<beans xmlns="http://www.springframework.org/schema/beans"
xmlns:xsi="http://www.w3.org/2001/XMLSchema-instance"
xmlns:util="http://www.springframework.org/schema/util"
xsi:schemaLocation="http://www.springframework.org/schema/beans http://www.springframework.org/schema/beans/spring-beans.xsd
http://www.springframework.org/schema/util http://www.springframework.org/schema/util/spring-util.xsd">
</beans>
|
使用util标签完成list集合注入提取
1
2
3
4
5
6
7
8
| <util:list id="bookList">
<value>book1</value>
<value>book2</value>
<value>book3</value>
</util:list>
<bean id="" class="">
<property name="" ref="bookList"></property>
</bean>
|
Bean管理
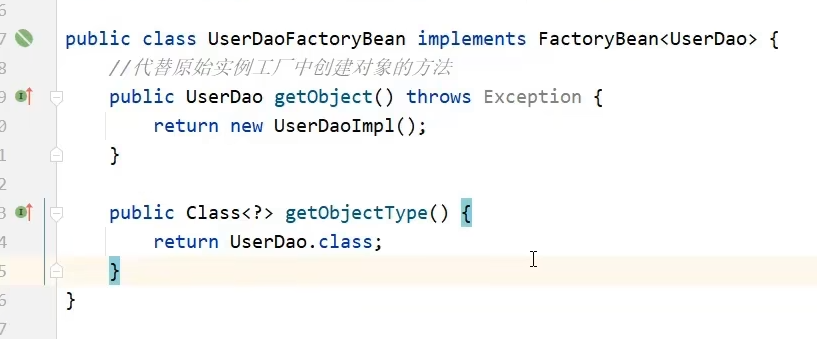
Spring有两种bean,一种是普通bean,另外一种是工厂bean(FactoryBean)
普通bean:配置文件中定义的bean类型就是返回类型
工厂bean:配置文件中定义的bean类型和返回类型可能不一样
步骤:
- 第一步:创建类,让这个类作为工厂bean,实现接口FactoryBean
- 第二步:实现接口里面的方法,定义返回的bean类型
Spring里面默认的bean是单实例对象
设置多实例:bean标签里属性:scope
- 默认值:singleton:单实例,在加载spring配置文件的时候创建实例对象
- prototype:多实例,在调用的时候创建实例对象
- request
- session
Bean生命周期-从创建到销毁的过程
无参构造bean实例
调用set方法
调用初始化方法(配置 init-method="")
bean可以使用了
容器关闭的时候调用bean销毁的方法(配置destory-method="")
销毁:(ClassPathXmlApplicationContext)context.close()
若加上后置处理器,则有七部,多的两步分别在init之前和之后,
定义一个类实现BeanPostProcessor接口
自动装配(仅限于引用类型)
设置bean属性autowire
byName:根据属性名称注入,id要和类属性名称一样
byType:根据属性类型注入
引入外部属性文件(Properties)
加入xml的命名空间
1
2
3
4
5
6
7
8
| <?xml version="1.0" encoding="UTF-8"?>
<beans xmlns="http://www.springframework.org/schema/beans"
xmlns:xsi="http://www.w3.org/2001/XMLSchema-instance"
xmlns:util="http://www.springframework.org/schema/util"
xmlns:context="http://www.springframework.org/schema/context"
xsi:schemaLocation="http://www.springframework.org/schema/beans http://www.springframework.org/schema/beans/spring-beans.xsd
http://www.springframework.org/schema/util http://www.springframework.org/schema/util/spring-util.xsd
http://www.springframework.org/schema/context http://www.springframework.org/schema/context/spring-context.xsd">
|
引入外部属性文件以及配置连接池
1
2
3
4
5
6
|
<context:property-placeholder location="classpath:jdbc.properties"/>
<bean id="dataSource" class="">
<property name="driverClassName" value="${prop.driverClass}"></property>
</bean>
|
4.2 注解
注意:在管理第三方bean时,若第三方bean需要进行依赖注入,若为基本类型,则在属性上方使用@Value注解,若为引用类型,则在方法的形参中指定形参,则Spring会进行自动装配。
Bean:被创建或者被管理的对象在IOC容器中统称为Bean
IOC补充
Spring配置文件
Bean标签范围(scope )
- prototype
多例(默认为单例,读取配置文件时创建,但是多例在调用getBean()时实例化)
- request
- session
- global session
为什么默认为单例?不然容器中的bean会无穷无尽
那些bean不适合交给容器管理?有状态的bean
Bean生命周期配置
1
| <bean id="" class="" init-method="init" destory-method="destory"></bean>
|
Bean实例化三种方式
Bean依赖注入(在Ioc容器中将有依赖关系的bean进行关系绑定)
Service需要Dao,可以吧持久层传入业务层,不用自己获取。
构造方法
1
2
3
4
| <bean id="userDao" class=""></bean>
<bean id="userService" class="">
<constructor-arg name="userDao" ref="userDao"></constructor-arg>
</bean>
|
set方法
1
2
3
4
| <bean id="userDao" class=""></bean>
<bean id="userService" class="">
<property name="userDao" ref="userDao"></property>
</bean>
|
Bean依赖注入的数据类型
Spring配置数据源
Spring整合Mybatis
导入依赖
spring-jdbc Spring操作数据库的包
mybatis-spring(注意版本对应) Spring整个Mybatis的包
MybatisConfig.java
1
2
3
4
5
6
7
8
9
10
11
12
13
14
15
16
17
18
19
20
21
22
23
24
25
26
| package cn.d4wn.config;
import org.mybatis.spring.SqlSessionFactoryBean;
import org.mybatis.spring.mapper.MapperScannerConfigurer;
import org.springframework.context.annotation.Bean;
import javax.sql.DataSource;
public class MyBatisConfig {
@Bean
public SqlSessionFactoryBean sqlSessionFactory(DataSource dataSource) {
SqlSessionFactoryBean factoryBean = new SqlSessionFactoryBean();
factoryBean.setDataSource(dataSource);
factoryBean.setTypeAliasesPackage("cn.d4wn.pojo");
return factoryBean;
}
@Bean
public MapperScannerConfigurer mapperScannerConfigurer() {
MapperScannerConfigurer msc = new MapperScannerConfigurer();
msc.setBasePackage("cn.d4wn.dao");
return msc;
}
}
|
AOP(面向切面编程)
作用:在不惊动原始设计的基础上为其进行功能增强
导入依赖
aspectjweaver
spring-context(中的AOP)
核心概念
- 连接点:程序执行过程中的任意位置,说白了就是原始程序
- 切入点:匹配连接点的式子(切入点一定在连接点中),就是要追加功能的方法
- 通知:共性功能
- 通知类:定义通知的类
- 切面:描述通知与切入点的对应关系
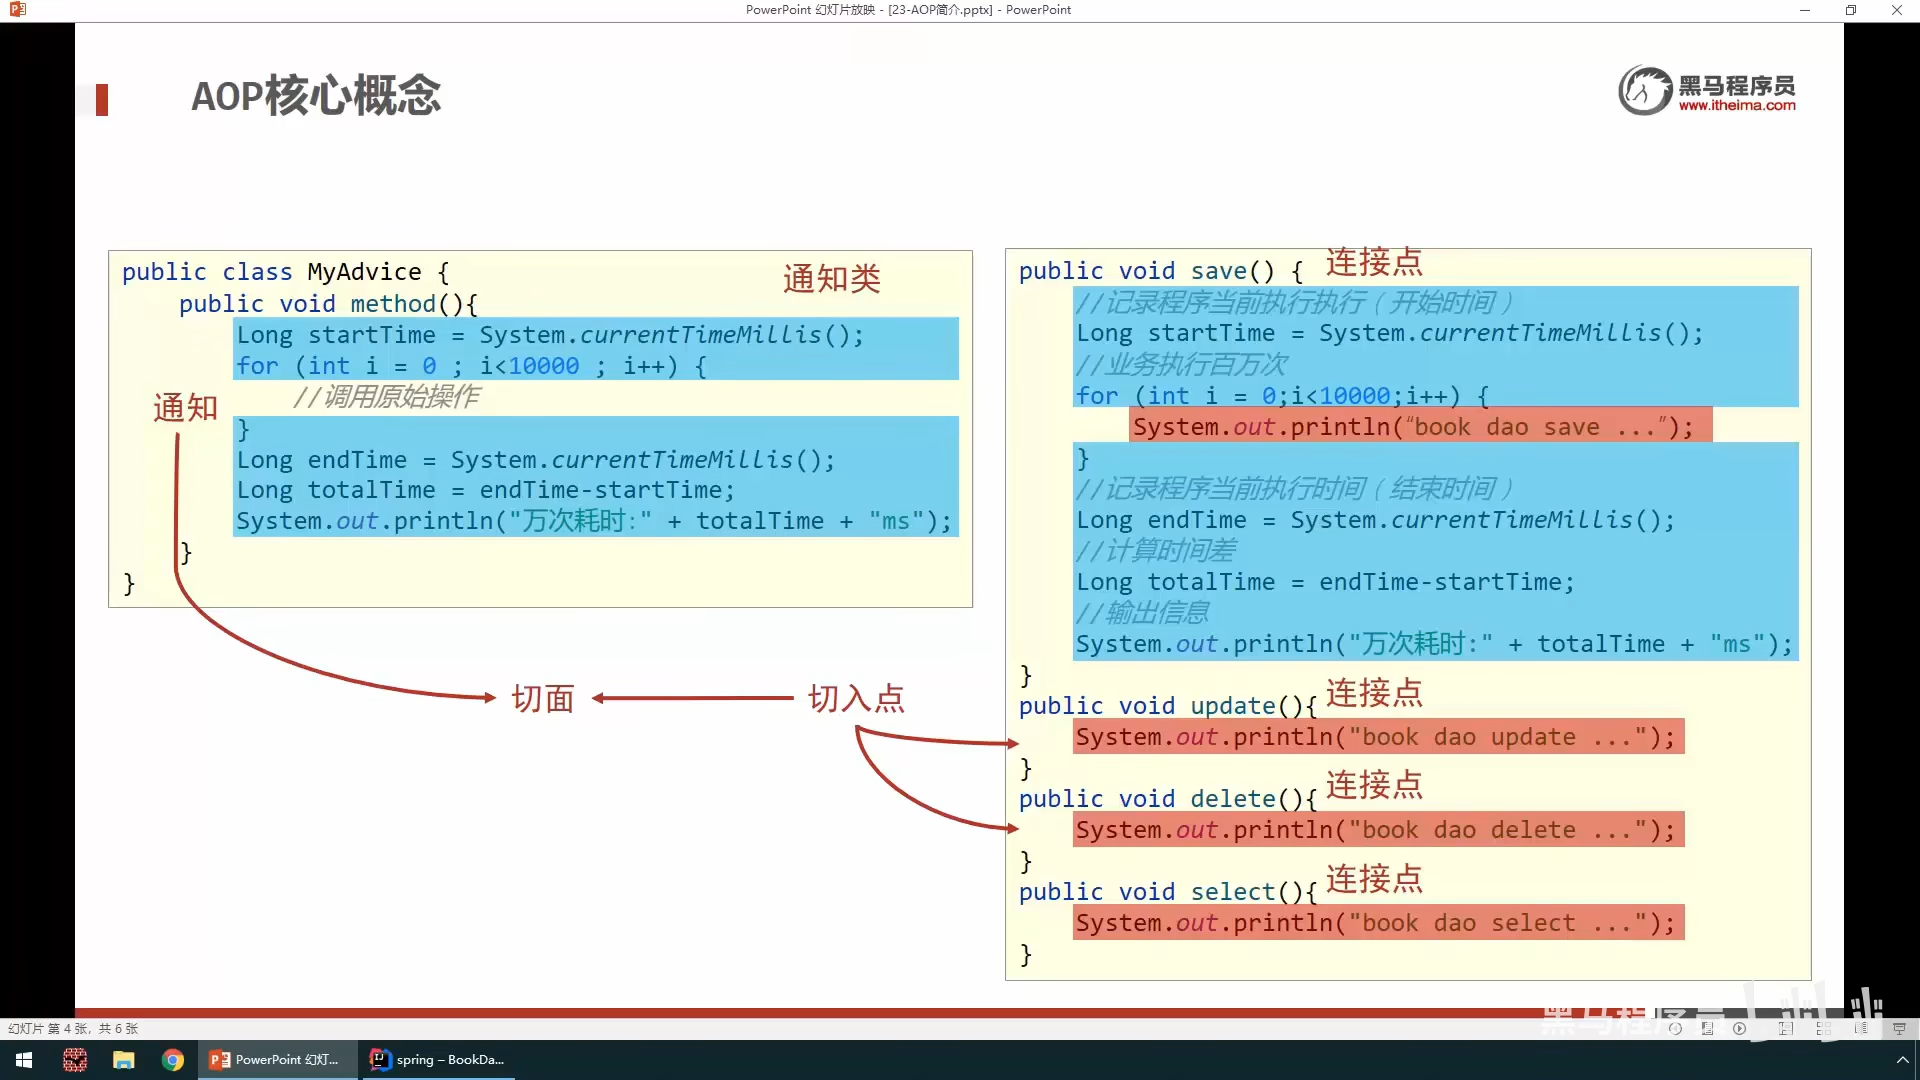 image-20221101153716403
案例
思路:
- 导入坐标
- 制作连接点方法
- 制作共性功能
- 定义切入点@Pointcut("execution(void
com.acdawn.dao.Bookdao.update)")
- 绑定切入点和通知关系
eg:
1
2
3
4
5
6
7
8
9
10
11
12
13
14
15
| @Component
@Aspect
public class MyAdvice {
@Pointcut("execution(void com.acdawn.dao.BookDao.update())")
private void pt(){};
@Before("pt()")
public void method(){
System.out.println(System.currentTimeMillis());
}
}
|
AOP切入点表达式
 image-20221103003408294
切入点:要进行增强的方法
切入带你表达式:要进行增强的方法的描述方式
标准格式:动作关键字(访问修饰符 返回符
报名.类/接口.方法名(参数)异常名)(支持通配符!!!)
execution(void com.acdawn.dao.BookDao.update())
注意:异常可以省略
通配符:
- *:单个任意符号
- ..:多个连续的任意符号
- +:专用于匹配子类型
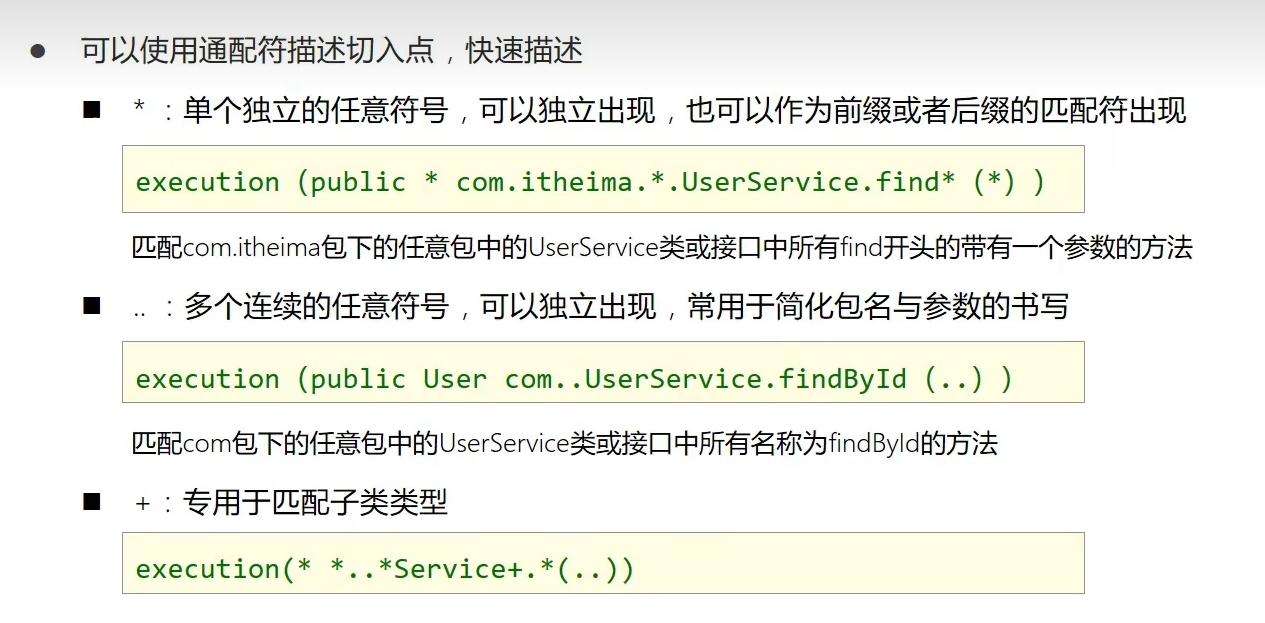 image-20221103080137153
描述切入点通常描述接口,而不描述实现类
查询类的返回值类型一般都用星号,增删改类的一般采用精准类型匹配
包名尽量不要使用..,而是使用*或者精确匹配
方法名书写以动词为精准匹配,名次采用*匹配,比如getById写成getBy*
通常不使用异常作为匹配规则
表达方式一:执行Dao
AOP通知类型
前置通知@Before
后置通知@After
环绕通知@Around
注意:这个异常必须抛,因为不明确切入点是否存在异常
1
2
3
4
5
6
7
8
| @Around("pt()")
public Object method(ProceedingJoinPoint pjp) throws Throwable {
Signature signature = pjp.getSignature();
System.out.println("before...");
Object obj = pjp.proceed();
System.out.println("after...");
return obj;
}
|
返回后通知@AfterReturning(必须正常返回才会执行)
抛出异常后通知@AfterThrowing(出现异常时才会执行)
AOP通知获取数据
获取参数
1
2
3
4
5
6
7
8
9
| @Around("pt()")
public void method(ProceedingJoinPoint pjp) throws Throwable {
Object[] args = pjp.getArgs();
System.out.println(Arrays.toString(args));
System.out.println("before...");
pjp.proceed(args);
System.out.println("after...");
}
}
|
获取返回值
1
2
3
4
5
6
| @AfterReturning(value = "pt()",returning = "ret")
public void method(Object ret) throws Throwable {
System.out.println("afterReturning..."+ret);
}
}
|
获取异常信息
获取切入点名称
1
2
3
4
5
6
7
8
9
10
11
12
13
14
15
16
17
18
19
| public class MyAdvice {
@Pointcut("execution(* cn.d4wn.*.*Service.getAll())")
private void pt() {
}
@Around("pt()")
public Object method(ProceedingJoinPoint pjp) throws Throwable {
Signature signature = pjp.getSignature();
String name = signature.getName();
long start = System.currentTimeMillis();
for (int i = 0; i < 10000; i++) {
Object obj = pjp.proceed();
}
long end = System.currentTimeMillis();
System.out.println(name + ":" + (end - start));
return null;
}
}
|
Spring事务
Spring事务作用:在数据层或者业务层保障一系列的数据库操作同时成功或者失败。
步骤:
在业务层接口上添加Spring事务管理(通常在业务层接口中,可以降低耦合)
1
2
3
4
| public interface Service{
@Transactional
public void transfer(String out,String in,Double money);
}
|
设置事务管理器
1
2
3
4
5
6
| @Bean
public PlatformTransactionManager transactionManager(DataSource dataSource){
DataSourceTransactionManager ptm = new DataSourceTransactionManager();
ptm.setDataSource(dataSource);
return ptm;
}
|
开启注解式事务驱动
1
2
3
4
5
| @Configuration
@ComponentScan("com.acdawn")
@EnableTransactionManagement
public class SpringConfig {
}
|
SpringMVC
概述
SpringMVC技术与Servlet技术功能相同,均属于web层开发技术,但是代码更为简洁。
导入依赖
spring-webmvc
javax.servlet-api
1
2
3
4
5
6
7
8
9
10
11
12
|
<dependency>
<groupId>javax.servlet</groupId>
<artifactId>javax.servlet-api</artifactId>
<version>3.1.0</version>
<scope>provided</scope>
</dependency>
<dependency>
<groupId>org.springframework</groupId>
<artifactId>spring-webmvc</artifactId>
<version>5.2.10.RELEASE</version>
</dependency>
|
入门案例
- 导入坐标
- 创建类似Servlet的SpringMVC控制器
- 初始化SpringMVC环境
- 初始化Servlet容器,加载SpringMVC环境
1
2
3
4
5
6
7
8
9
10
11
12
13
14
15
16
17
18
19
20
21
22
23
24
25
26
27
28
29
30
31
32
| package cn.d4wn.config;
import org.springframework.web.context.WebApplicationContext;
import org.springframework.web.context.support.AnnotationConfigWebApplicationContext;
import org.springframework.web.servlet.support.AbstractDispatcherServletInitializer;
public class ServletContainerInitConfig extends AbstractDispatcherServletInitializer {
@Override
protected WebApplicationContext createServletApplicationContext() {
AnnotationConfigWebApplicationContext ctx = new AnnotationConfigWebApplicationContext();
ctx.register(SpringMvcConfig.class);
return ctx;
}
@Override
protected String[] getServletMappings() {
return new String[]{"/"};
}
@Override
protected WebApplicationContext createRootApplicationContext() {
AnnotationConfigWebApplicationContext ctx = new AnnotationConfigWebApplicationContext();
ctx.register(SpringConfig.class);
return ctx;
}
}
|
1
2
3
4
5
6
7
8
9
10
11
12
13
14
15
16
17
18
19
20
21
22
23
24
| package cn.d4wn.config;
import org.springframework.web.servlet.support.AbstractAnnotationConfigDispatcherServletInitializer;
public class ServletContainerInitConfig extends AbstractAnnotationConfigDispatcherServletInitializer {
@Override
protected Class<?>[] getRootConfigClasses() {
return new Class[]{SpringConfig.class};
}
@Override
protected Class<?>[] getServletConfigClasses() {
return new Class[]{SpringMvcConfig.class};
}
@Override
protected String[] getServletMappings() {
return new String[]{"/"};
}
}
|
1
2
3
4
5
6
7
8
9
10
11
12
13
14
15
16
17
18
| package cn.d4wn.config;
import org.springframework.context.annotation.*;
import org.springframework.stereotype.Controller;
import org.springframework.transaction.annotation.EnableTransactionManagement;
@Configuration
@ComponentScan(value = "cn.d4wn",excludeFilters = @ComponentScan.Filter(
type = FilterType.ANNOTATION,
classes = Controller.class
))
@PropertySource("classpath:JDBC.properties")
@Import({JDBCConfig.class, MyBatisConfig.class})
@EnableAspectJAutoProxy
@EnableTransactionManagement
public class SpringConfig {
}
|
1
2
3
4
5
6
7
8
9
10
| package cn.d4wn.config;
import org.springframework.context.annotation.ComponentScan;
import org.springframework.context.annotation.Configuration;
@Configuration
@ComponentScan("cn.d4wn.controller")
public class SpringMvcConfig {
}
|
1
2
3
4
5
6
7
8
9
10
11
12
13
14
15
16
17
18
19
20
21
22
23
24
25
26
27
28
29
30
31
32
33
34
35
36
37
38
39
40
41
42
43
44
45
46
47
48
49
50
51
52
53
54
55
56
57
58
59
60
61
62
63
64
65
66
67
68
69
70
71
72
73
74
75
76
77
78
79
80
81
82
83
84
85
86
87
88
89
90
91
92
93
94
95
96
97
98
99
100
101
102
103
104
105
106
107
108
109
110
111
112
113
114
115
116
117
118
119
| <?xml version="1.0" encoding="UTF-8"?>
<project xmlns="http://maven.apache.org/POM/4.0.0" xmlns:xsi="http://www.w3.org/2001/XMLSchema-instance"
xsi:schemaLocation="http://maven.apache.org/POM/4.0.0 http://maven.apache.org/xsd/maven-4.0.0.xsd">
<modelVersion>4.0.0</modelVersion>
<groupId>org.example</groupId>
<artifactId>SpringMVC</artifactId>
<version>1.0-SNAPSHOT</version>
<packaging>war</packaging>
<name>SpringMVC Maven Webapp</name>
<url>http://www.example.com</url>
<properties>
<project.build.sourceEncoding>UTF-8</project.build.sourceEncoding>
<maven.compiler.source>1.7</maven.compiler.source>
<maven.compiler.target>1.7</maven.compiler.target>
</properties>
<dependencies>
<dependency>
<groupId>junit</groupId>
<artifactId>junit</artifactId>
<version>4.11</version>
<scope>test</scope>
</dependency>
<dependency>
<groupId>org.springframework</groupId>
<artifactId>spring-context</artifactId>
<version>5.2.10.RELEASE</version>
</dependency>
<dependency>
<groupId>com.alibaba</groupId>
<artifactId>druid</artifactId>
<version>1.0.16</version>
</dependency>
<dependency>
<groupId>mysql</groupId>
<artifactId>mysql-connector-java</artifactId>
<version>6.0.2</version>
</dependency>
<dependency>
<groupId>org.mybatis</groupId>
<artifactId>mybatis-spring</artifactId>
<version>2.0.2</version>
</dependency>
<dependency>
<groupId>org.springframework</groupId>
<artifactId>spring-jdbc</artifactId>
<version>5.2.9.RELEASE</version>
</dependency>
<dependency>
<groupId>org.aspectj</groupId>
<artifactId>aspectjweaver</artifactId>
<version>1.9.7</version>
</dependency>
<dependency>
<groupId>org.springframework</groupId>
<artifactId>spring-webmvc</artifactId>
<version>5.2.10.RELEASE</version>
</dependency>
<dependency>
<groupId>javax.servlet</groupId>
<artifactId>javax.servlet-api</artifactId>
<version>3.1.0</version>
<scope>provided</scope>
</dependency>
</dependencies>
<build>
<finalName>SpringMVC</finalName>
<pluginManagement>
<plugins>
<plugin>
<groupId>org.apache.tomcat.maven</groupId>
<artifactId>tomcat7-maven-plugin</artifactId>
<version>2.1</version>
<configuration>
<port>80</port>
<path>/</path>
</configuration>
</plugin>
<plugin>
<artifactId>maven-clean-plugin</artifactId>
<version>3.1.0</version>
</plugin>
<plugin>
<artifactId>maven-resources-plugin</artifactId>
<version>3.0.2</version>
</plugin>
<plugin>
<artifactId>maven-compiler-plugin</artifactId>
<version>3.8.0</version>
</plugin>
<plugin>
<artifactId>maven-surefire-plugin</artifactId>
<version>2.22.1</version>
</plugin>
<plugin>
<artifactId>maven-war-plugin</artifactId>
<version>3.2.2</version>
</plugin>
<plugin>
<artifactId>maven-install-plugin</artifactId>
<version>2.5.2</version>
</plugin>
<plugin>
<artifactId>maven-deploy-plugin</artifactId>
<version>2.8.2</version>
</plugin>
</plugins>
</pluginManagement>
</build>
</project>
|
1
2
3
4
5
6
7
8
9
10
11
12
13
14
15
16
| package com.acdawn.controller;
import org.springframework.stereotype.Controller;
import org.springframework.web.bind.annotation.RequestMapping;
import org.springframework.web.bind.annotation.ResponseBody;
@Controller
public class IndexController {
@RequestMapping("/save")
@ResponseBody
public String save(){
System.out.println("i love you");
return "{'info':'forever'}";
}
}
|
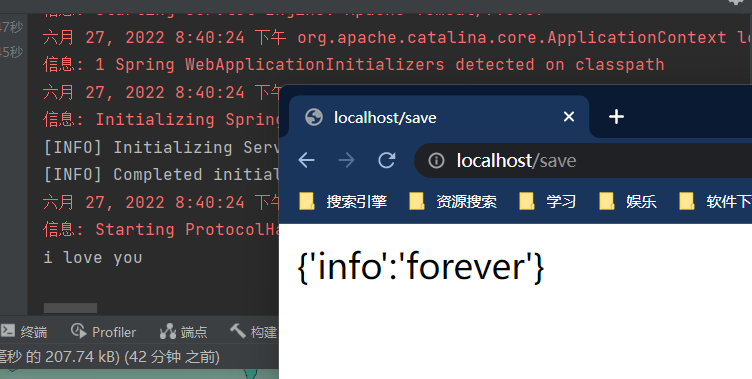 image-20220627204814128
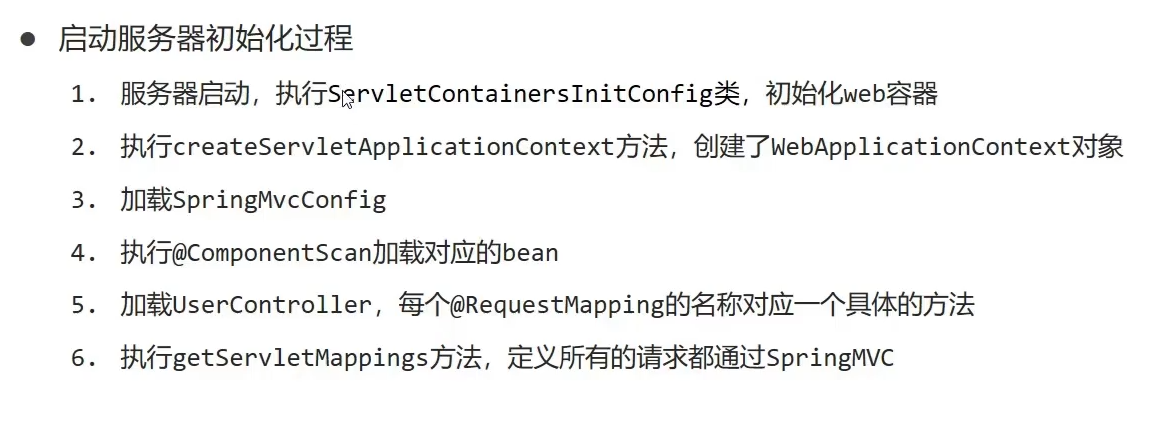
Bean加载控制
避免Spring加载SpringMVC加载的Bean:
Spring加载的bean设定扫描范围精确化
案例简化:
1
2
3
4
5
6
7
8
9
10
11
12
13
14
15
16
17
18
| public class ServletConfig extends AbstractAnnotationConfigDispatcherServletInitializer {
@Override
protected Class<?>[] getRootConfigClasses() {
return new Class[]{SpringConfig.class};
}
@Override
protected Class<?>[] getServletConfigClasses() {
return new Class[]{SpringMvcConfig.class};
}
@Override
protected String[] getServletMappings() {
return new String[]{"/"};
}
}
|
 image-20220627211332386
请求路径
1
2
3
4
5
6
7
8
9
10
| @Controller
@RequestMapping("/user")
public class IndexController {
@RequestMapping("/save")
@ResponseBody
public String save(){
System.out.println("i love you");
return "{'info':'forever'}";
}
}
|
参数
如何处理中文乱码?
在ServletConfig.java中添加如下配置
1
2
3
4
5
6
7
| @Override
protected Filter[] getServletFilters() {
CharacterEncodingFilter filter = new CharacterEncodingFilter();
filter.setEncoding("UTF-8");
return new Filter[]{filter};
}
|
1
2
3
4
5
6
7
8
9
| @Controller
public class IndexController {
@RequestMapping("/save")
@ResponseBody
public String save(String name){
return "i love you"+name;
}
}
|
普通参数
1
2
3
| public String save(@RequestParam("name") String userName){
return "i love you"+userName;
}
|
实体类
1
2
3
| public String save(User user){
return "i love you";
}
|
注意:若前端传递的参数名称,在实体类中有set方法,则会自动set
实体类中含有引用类型
请求方式应如下(其中info为引用数据类型)
http://localhost/?name=qy&age=18&info.homework=many&info.city=xxx
数组
http://localhost/?name=a&name=b&name=c
1
2
3
| public String save(String likes[]){
return "i love you";
}
|
集合
1
2
3
| public String save(@RequestParam List<String> likes){
return "we'll meet again";
}
|
json-集合
依赖
1
2
3
4
5
| <dependency>
<groupId>com.fasterxml.jackson.core</groupId>
<artifactId>jackson-databind</artifactId>
<version>2.9.0</version>
</dependency>
|
配置
1
2
3
| public String save(@RequestBody List<String> likes){
return "we'll meet again";
}
|
json-实体类
1
2
3
| public String save(@RequestBody User user){
return "i love you";
}
|
json-集合中有实体类
1
2
3
| public String save(@RequestBody List<User> likes){
return "we'll meet again";
}
|
日期、时间
1
2
3
4
5
6
7
8
9
| @Controller
public class IndexController {
@RequestMapping("/save")
@ResponseBody
public void save(@DateTimeFormat(pattern = "yyyy-MM-dd HH:mm:ss") Date date){
System.out.println(date);
}
}
|
响应
若返回字符串或者json,则加上@ResponseBody,否则返回页面
@ResponseBody作用:设置当前控制器返回值为响应体
1
2
3
4
5
6
7
8
9
10
11
12
13
14
15
16
17
18
19
20
21
22
23
24
25
26
| package cn.d4wn.controller;
import cn.d4wn.pojo.Users;
import org.springframework.stereotype.Controller;
import org.springframework.web.bind.annotation.RequestMapping;
import org.springframework.web.bind.annotation.ResponseBody;
@Controller
public class IndexController {
@RequestMapping("/toPage")
public String save() {
return "index.jsp";
}
@RequestMapping("/toText")
@ResponseBody
public String toText(){
return "Hello";
}
@RequestMapping("/toUsers")
@ResponseBody
public Users toUsers(){
return new Users(1,"admin","admin");
}
}
|
REST风格
简介
就是访问网络资源的一种格式
表现形式转换
可以隐藏资源的访问行为,书写简化
 image-20221103205155187
描述的模块名称通常加上s
根据REST风格对资源进行访问成为RESTful
@PathVariable是形参注解,表明参数从路径中获取
1
2
3
4
5
6
7
8
9
10
11
12
13
14
15
16
17
18
19
20
21
22
23
24
25
26
| @Controller
public class IndexController {
@RequestMapping(value = "/users/{name}", method = RequestMethod.POST)
@ResponseBody
public void add(@PathVariable String name) {
System.out.println("add..." + name);
}
@RequestMapping(value = "/users/{name}", method = RequestMethod.DELETE)
@ResponseBody
public void delete(@PathVariable String name) {
System.out.println("delete..." + name);
}
@RequestMapping(value = "/users/{name}", method = RequestMethod.PUT)
@ResponseBody
public void update(@PathVariable String name) {
System.out.println("update..." + name);
}
@RequestMapping(value = "/users/{name}", method = RequestMethod.GET)
@ResponseBody
public void get(@PathVariable String name) {
System.out.println("get..." + name);
}
}
|
应用:
发送参数超过一个时,以json格式为主,@RequsetBody应用较广
发送非json数据,用@RequestParam接收请求参数
参数数量较少时,可以用@PathVariable
简化版本:
1
2
3
4
5
6
7
8
9
10
11
12
13
14
15
16
17
18
19
20
21
22
23
24
| @RestController
@RequestMapping("/users")
public class IndexController {
@PostMapping
public void add() {
System.out.println("add...");
}
@DeleteMapping("/{name}")
public void delete(@PathVariable String name) {
System.out.println("delete..." + name);
}
@PutMapping("/{name}")
public void update(@PathVariable String name) {
System.out.println("update..." + name);
}
@GetMapping("/{name}")
public void get(@PathVariable String name) {
System.out.println("get..." + name);
}
}
|
如何阻止SpringMVC过滤全部页面?
创建config类:SpringMVCSupport
1
2
3
4
5
6
7
8
| @Configuration
public class SpringMVCSupport extends WebMvcConfigurationSupport {
@Override
protected void addResourceHandlers(ResourceHandlerRegistry registry) {
registry.addResourceHandler("/pages/*").addResourceLocations("/pages/");
}
}
|
同时配置SpringMvcConfig.java
1
2
3
4
5
| @Configuration
@ComponentScan({"com.acdawn.controller","com.acdawn.config"})
@EnableWebMvc
public class SpringMvcConfig {
}
|
SSM整合
表现层数据封装
设置统一数据返回结果类
1
2
3
4
5
| public class Result{
private Object data;
private Integer code;
private String msg;
}
|
然后创建一个code类,返回前端的均是Result类
异常处理器
1
2
3
4
5
6
7
8
9
| @RestControllerAdvice
public class ExceptionAddress {
@ExceptionHandler(Exception.class)
public Result doException(Exception e){
System.out.println("出现异常");
return new Result(666,"异常",null);
}
}
|
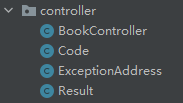 image-20220628135249060
拦截器
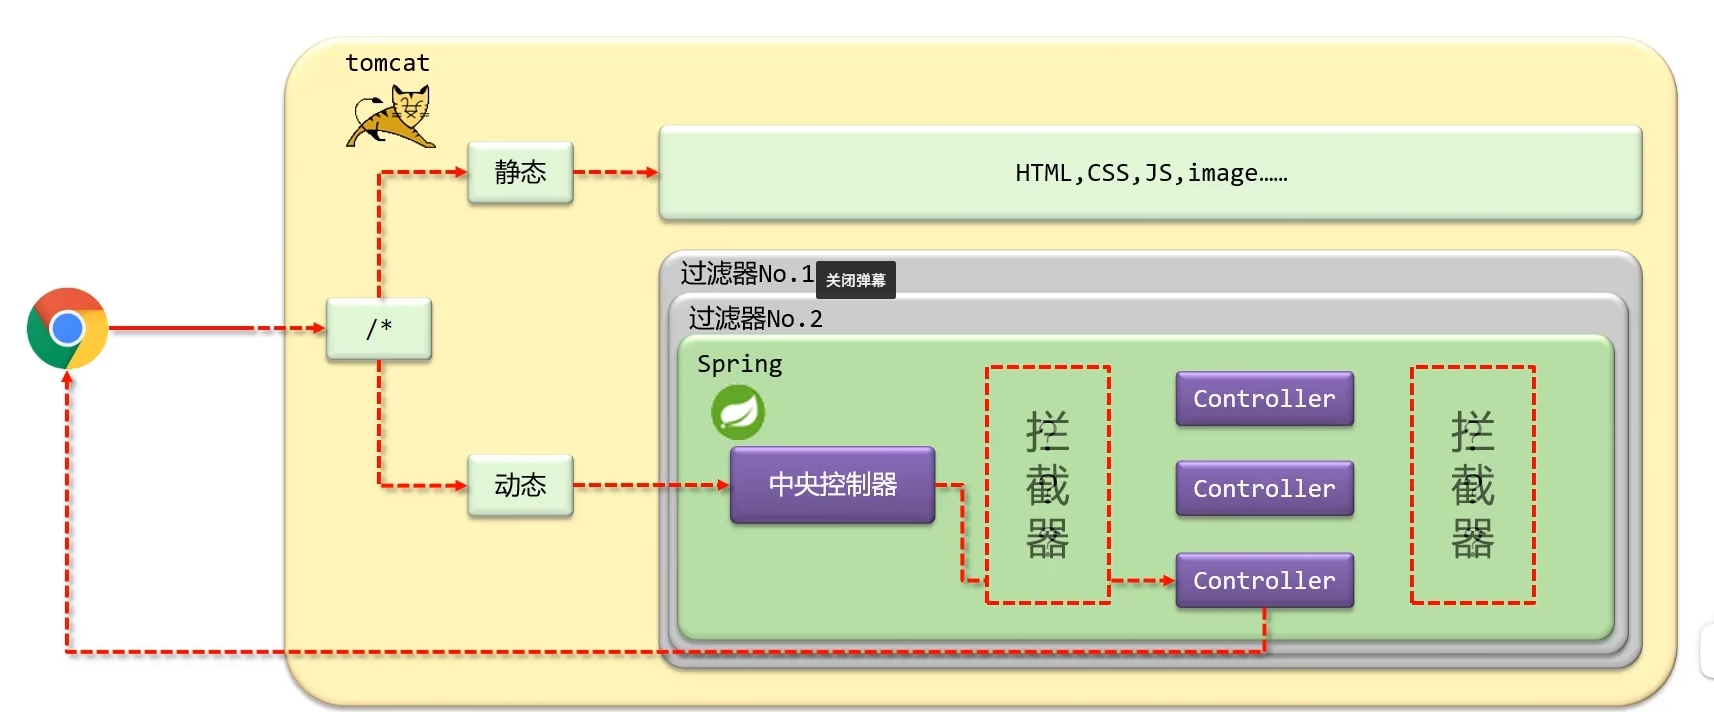 image-20221105222550026
是一种动态拦截方法调用的机制,在SpringMVC中动态拦截控制器方法的执行
作用:在指定的方法调用前后执行预先设定的代码
拦截器和过滤器有什么区别呢?
归属不同:Filter属于Servlet技术,Interceptor属于SpringMVC技术
拦截内容不同:Filter对所有的访问进行增强,Interceptor仅针对SpringMVC的访问进行增强
区别:过滤器在tomcat层面,对所有访问进行增强,拦截器仅针对SpringMVC的访问进行增强
Springboot
官方文档:Getting
Started (spring.io)
优点:
- 自动配置
- 起步依赖简化
- 内置服务器
使用Springboot需要继承父工程
1
2
3
4
5
6
7
8
9
10
11
12
13
|
<parent>
<groupId>org.springframework.boot</groupId>
<artifactId>spring-boot-starter-parent</artifactId>
<version>2.7.0</version>
</parent>
<dependencies>
<dependency>
<groupId>org.springframework.boot</groupId>
<artifactId>spring-boot-starter-web</artifactId>
</dependency>
</dependencies>
|
- Springboot的引导类是项目入口
- 配置文件优先级properties>yml>yaml
如何读取配置文件?
@value(${key})
1
2
3
4
5
|
address: [beijing,shanghai]
msg: "hello world"
msg2: 'hello \n'
|
Environment
1
2
3
4
5
6
7
8
9
10
| @RestController
@RequestMapping()
public class Controller {
@Autowired
private Environment env;
@RequestMapping("/hello")
public String Hello() {
return env.getProperty("parent.son");
}
}
|
@ConfigurationProperties
1
2
3
4
5
6
7
8
9
10
11
12
13
14
15
16
17
18
19
20
21
22
23
24
25
26
27
28
29
30
31
32
33
34
35
36
37
38
39
40
41
42
43
44
| package com.acdawn.Controller;
import org.springframework.boot.context.properties.ConfigurationProperties;
import org.springframework.stereotype.Component;
@Component
@ConfigurationProperties(prefix = "person")
public class Person {
private int age;
private String name;
public int getAge() {
return age;
}
public void setAge(int age) {
this.age = age;
}
public String getName() {
return name;
}
public void setName(String name) {
this.name = name;
}
}
package com.acdawn.Controller;
import org.springframework.beans.factory.annotation.Autowired;
import org.springframework.core.env.Environment;
import org.springframework.web.bind.annotation.RequestMapping;
import org.springframework.web.bind.annotation.RestController;
@RestController
@RequestMapping()
public class Controller {
@Autowired
private Person person;
@RequestMapping("/hello")
public String Hello() {
return person.getName();
}
}
|
配置文件加载顺序?
- 项目的config目录下
- 项目下的文件
- 模块下的config目录
- 模块下的文件
如何使jar包支持maven插件支持?
1
2
3
4
5
6
7
8
| <build>
<plugins>
<plugin>
<groupId>org.springframework.boot</groupId>
<actifactId>spring-boot-maven-plugin</actifactId>
</plugin>
</plugins>
</build>
|
SpringBoot 整合Mybatis
在配置文件中加上:
1
2
3
4
5
6
7
| spring:
datasource:
driver-class-name:
url:
username:
password:
type: com.alibaba.druid.pool.DruidDataSource
|
MyBatisPlus
MP是基于Mybatis框架上开发的增强型工具
入门案例
1
2
| @Mapper
public interface UserDao extends BaseMapper<User>{}
|
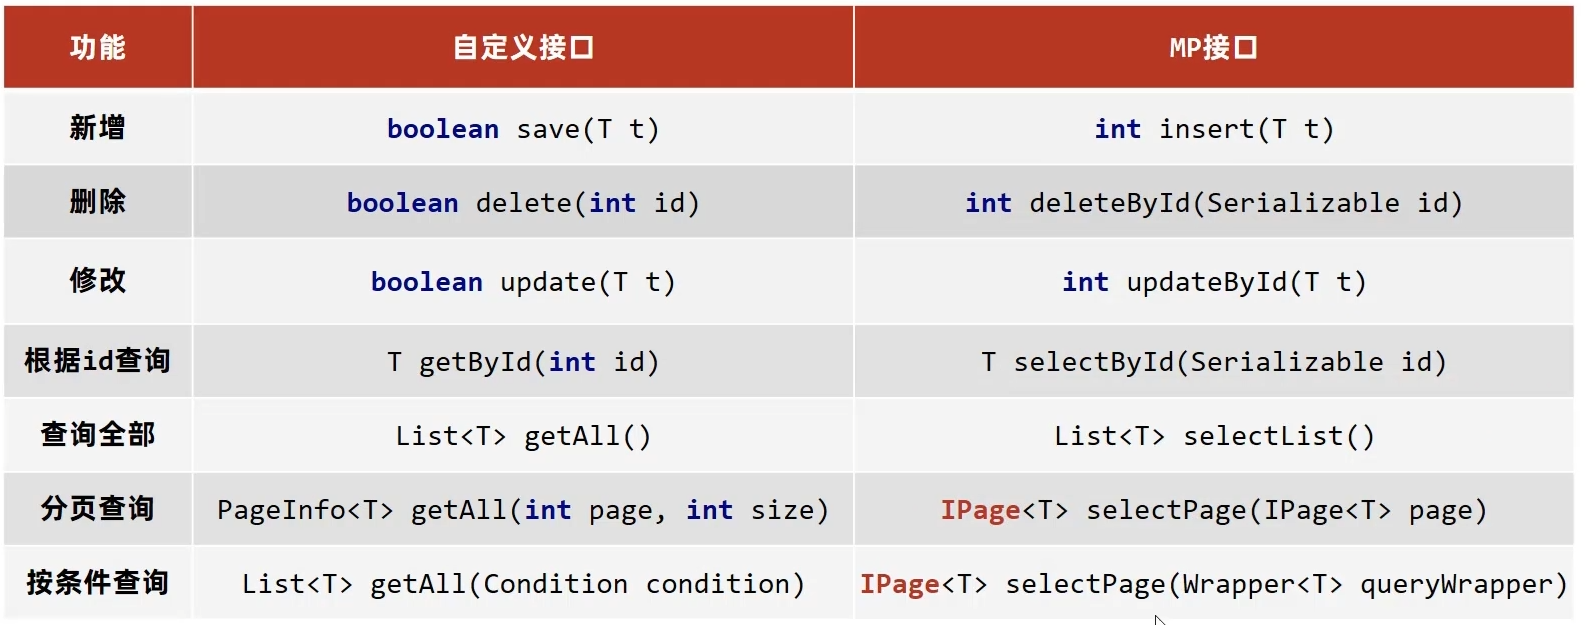 image-20221105192724951
Thymeleaf
Thymeleaf文件默认放在resources/templates下
Druid
配置文件:
1
2
3
4
5
6
7
8
9
10
11
|
driverClassName=com.mysql.cj.jdbc.Driver
url=jdbc:mysql://120.53.236.54:3306/abc?useSSL=false&serverTimezone=UTC
username=acdawn
password=acdawn
initialSize=5
maxActive=10
maxWait=3000
|
1
2
3
4
5
| Properties prop = new Properties();
prop.load(new FileInputStream("src/abc.properties"));
DataSource dataSource = DruidDataSourceFactory.createDataSource(prop);
Connection connection=dataSource.getConnection();
System.out.println(connection);
|


